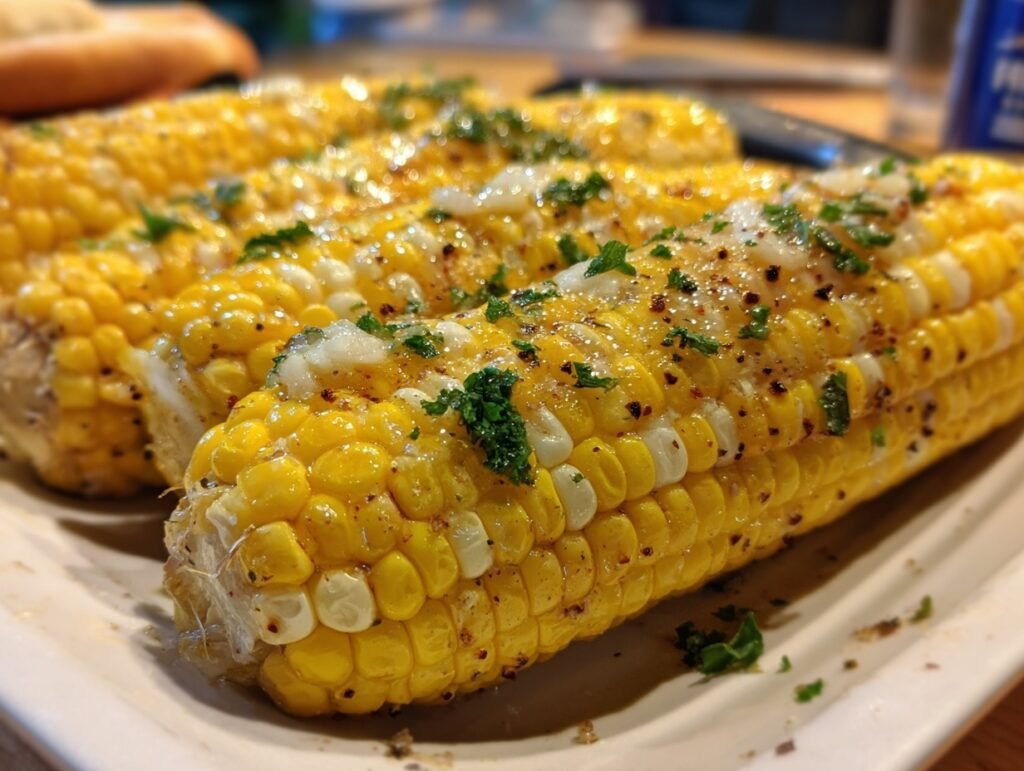
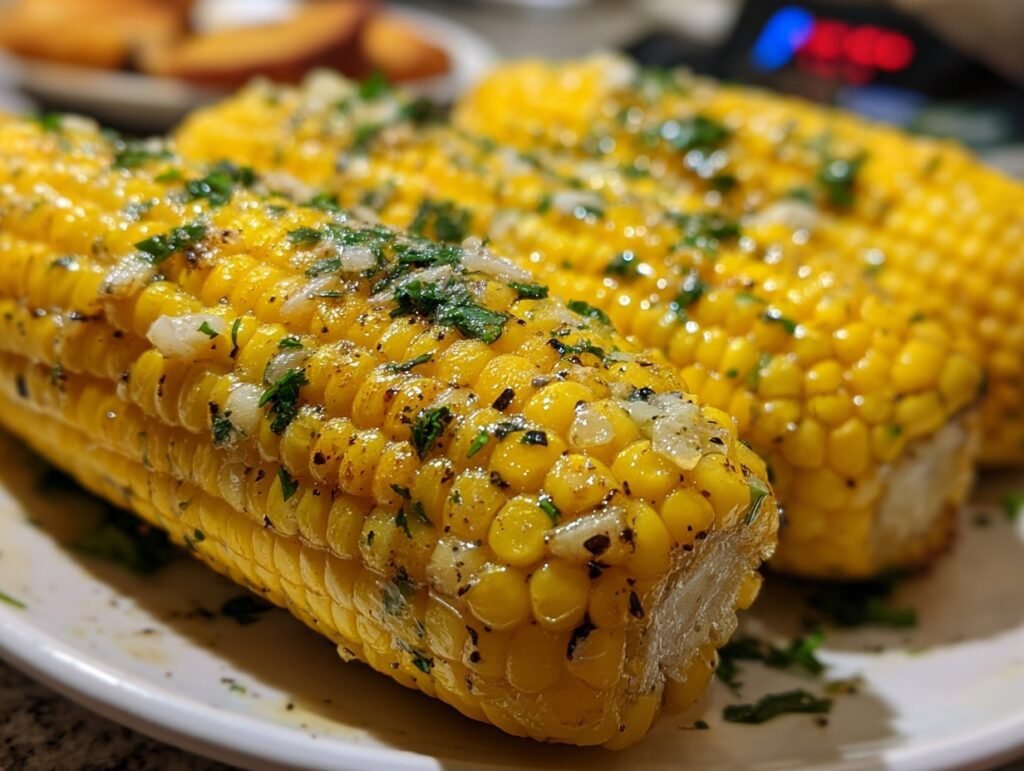
Imagine the sun-kissed glow of fresh corn on the cob, glistening under a lavish blanket of golden garlic butter, steam rising in fragrant curls that carry the irresistible aroma of minced garlic mingling with earthy parsley. One bite delivers a symphony of flavors: sweet, juicy kernels bursting with summer’s essence, enveloped in creamy, herb-infused richness that melts on your tongue. Garlic Butter Corn on the Cob isn’t just a side dish—it’s a sensory explosion that turns ordinary barbecues into unforgettable feasts.
This Pinterest-perfect recipe shines with its vibrant yellow hues and glossy finish, making it a showstopper for your feed. Husked ears grilled or boiled to tender perfection, slathered in homemade garlic butter—it’s as easy as it is stunning. Whether you’re hosting a backyard gathering or weeknight dinner, Garlic Butter Corn on the Cob delivers crowd-pleasing magic in under 30 minutes. For even more corn inspiration, check out these delicious corn on the cob recipes that’ll have you dreaming of summer all year. Pin this now—your followers will thank you for the visual feast and simple genius.
Why You’ll Love This Recipe
Garlic Butter Corn on the Cob transforms humble corn into a buttery, garlicky dream that’s ready in minutes, letting you focus on the joy of sharing rather than slaving over the stove. Its effortless prep means more time laughing with loved ones, while the presentation—plump ears drizzled with shimmering butter and flecked with green parsley—creates Instagram-worthy moments that scream “summer vibes.” You’ll love how it elevates any meal with minimal effort.
The versatility shines through: grill it for smoky char, boil for classic tenderness, or even air-fry for a crispy twist. This recipe’s shareability comes from its universal appeal—kids devour the sweetness, adults savor the savory punch—sparking envy and “recipe please!” comments on your pins. Feel the emotional rush of nailing a dish that’s as nourishing for the soul as it is for the body.
Ingredients
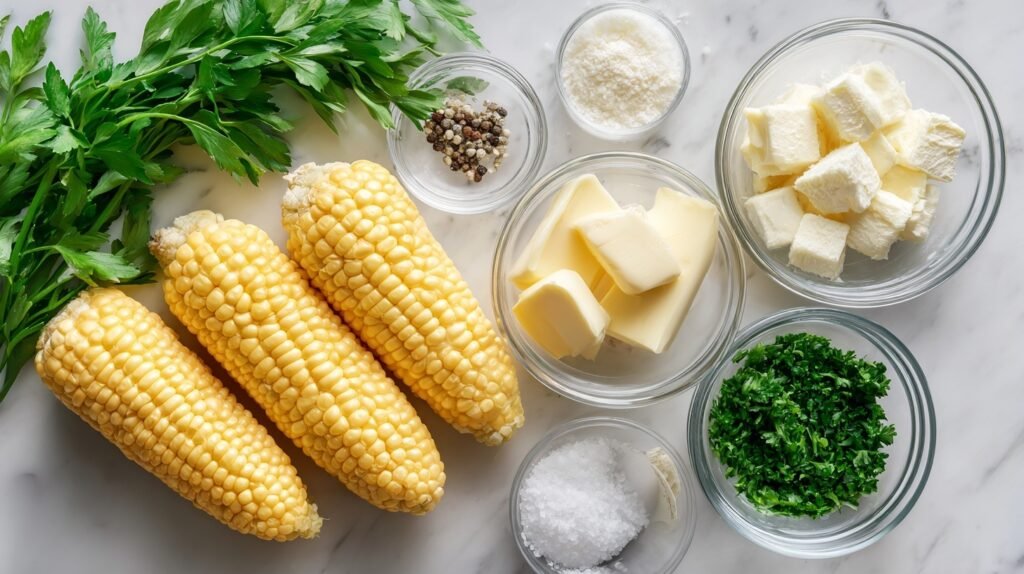
These simple, fresh ingredients harmonize beautifully: sweet corn provides juicy crunch, softened butter creates a silky base, pungent minced garlic adds bold aroma, and parsley brings a fresh, vibrant pop. Salt and pepper tie it all together for balanced, addictive flavor that enhances the corn’s natural sweetness without overpowering it.
Ingredients (makes 4 ears):
– 4 ears fresh corn on the cob, husked (or frozen if fresh unavailable)
– 1/2 cup unsalted butter, softened (or ghee for richer taste)
– 4 garlic cloves, minced (jarred minced garlic works in a pinch)
– 2 tablespoons chopped fresh parsley (dried parsley as substitute, use 1 tbsp)
– 1/2 teaspoon salt
– 1/4 teaspoon black pepper
Quick Overview
– Prep Time: 10 minutes
– Cook Time: 10-15 minutes
– Total Time: 20-25 minutes
– Servings: 4
– Difficulty Level: Easy
This Garlic Butter Corn on the Cob recipe is a busy cook’s dream—whip up the butter in seconds, cook the corn while you prep, and serve hot. No fancy equipment needed, just basic kitchen tools for restaurant-quality results in record time.
Step-by-Step Instructions
Get ready to create magic with this foolproof Garlic Butter Corn on the Cob! These steps build confidence, turning you into a grill master or stovetop pro. Follow along for golden, buttery perfection that’ll have everyone reaching for seconds.
1. Start by husking the 4 ears of corn, removing silk completely for smooth, even cooking. Rinse under cool water and pat dry with a clean towel. This ensures the butter clings perfectly without steaming excess moisture.
2. In a medium bowl, mash the 1/2 cup softened unsalted butter until creamy and smooth, about 1 minute with a fork. Look for a spreadable, no-lump texture.
3. Mince the 4 garlic cloves finely—aim for tiny pieces that melt into the butter. Stir them into the softened butter until evenly distributed and fragrant.
4. Chop 2 tablespoons fresh parsley finely, then fold it into the garlic butter mixture. Add 1/2 teaspoon salt and 1/4 teaspoon black pepper. Mix thoroughly for a vibrant green-flecked spread.
5. For boiling: Bring a large pot of water to a rolling boil over high heat. Add the corn ears and cook for 8-10 minutes, until kernels are bright yellow and tender when pierced with a knife.
6. For grilling: Preheat your grill to medium-high (about 400°F). Place husked corn directly on grates and grill 10-12 minutes, turning every 2-3 minutes for even char marks and golden kernels.
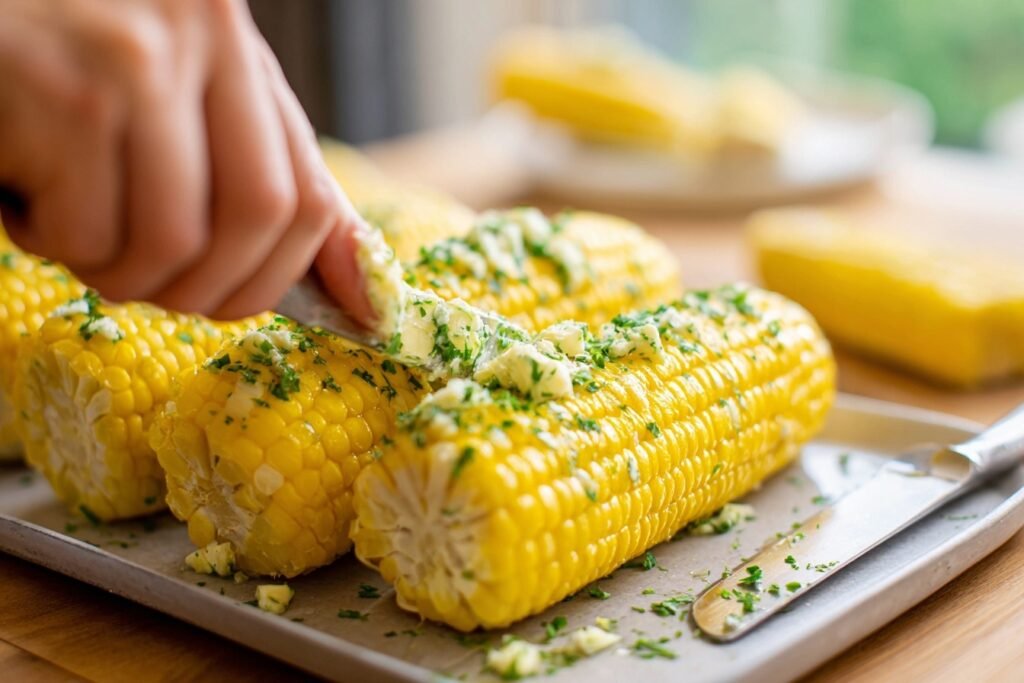
7. Remove corn from heat. While hot, generously slather each ear with the garlic butter mixture using a basting brush or spoon. Watch the butter melt into glossy pools.
8. Let the Garlic Butter Corn on the Cob rest 1-2 minutes so flavors infuse. Sprinkle extra parsley on top for a fresh, photogenic finish. Serve immediately for peak juiciness.
9. Pro move: If desired, return buttered corn to grill for 1 minute per side to caramelize the garlic butter into a crispy, nutty crust.
Pro Tips for Perfect Results
Elevate your Garlic Butter Corn on the Cob with these game-changing tips for flawless texture, explosive flavor, and pin-worthy presentation.
1. Choose peak-fresh corn: Select ears with bright green husks and plump, milky kernels when pressed. Freshness means maximum sweetness and snap—avoid dull or dry cobs for the best bite.
2. Room-temp butter is key: Soften butter at room temperature for 30 minutes, not microwaved. This ensures it spreads evenly without tearing delicate kernels or melting too fast.
3. Minimize garlic bite: After mincing, let garlic sit 5 minutes before mixing. This mellows raw sharpness, blending into a savory depth that complements corn’s sweetness.
4. Boost char without burning: For grilling, oil grates lightly and turn corn frequently. Aim for light brown spots—over-charring dries out the corn and mutes flavors.
5. Double the butter layer: Apply garlic butter in two stages—once post-cook, then again after resting. This creates a richer, drip-down-the-cob indulgence.
6. Parsley power: Use flat-leaf parsley for bolder taste. Snip just before mixing to preserve vibrant color and fresh, herbaceous notes that cut through buttery richness.
7. Test doneness smartly: Pierce a kernel with a fork—it should release milky juice, not watery liquid. This guarantees tender-crisp texture every time.
Serving Ideas & Variations
Picture Garlic Butter Corn on the Cob as the golden star of your summer spread, nestled beside juicy grilled chicken or veggie skewers. Drizzle extra melted garlic butter over a platter for a communal, finger-licking experience—perfect for picnics. Pair with fresh salads or roasted potatoes for a colorful plate that pops visually.
For variations, add a sprinkle of smoked paprika to the butter for smoky depth, or grate lemon zest for citrus zing that brightens the garlic. Try roasting in a 400°F oven for 15 minutes—kernels caramelize beautifully. Serve upright in a mug with handles for easy eating and adorable presentation.
Elevate dinners by slicing corn off the cob into salads, tossing with cherry tomatoes and feta. This Garlic Butter Corn on the Cob adapts endlessly, from vegan swaps (use plant-based butter) to spicy versions with chili flakes. It’s versatile magic that keeps meals exciting and shareable.
Nutritional Highlights
Fresh corn delivers fiber-rich carbs for sustained energy, while garlic offers antioxidants that support immunity. Parsley adds vitamin K for bone health, and butter provides satisfying fats. This balanced side promotes heart health with its veggie-forward profile.
Per serving (1 ear): ~250 calories, 4g protein, 25g carbs, 16g fat, 3g fiber. Low in sodium naturally, it’s a wholesome indulgence packed with vitamins A and C from corn.
Storage Made Simple
Store leftover Garlic Butter Corn on the Cob in an airtight container in the fridge for up to 3-4 days. Wrap each ear individually in foil or plastic to retain moisture and prevent butter from drying out. The flavors deepen overnight, making day-two lunches even tastier.
For longer storage, freeze buttered ears wrapped tightly in plastic and foil for up to 3 months. Thaw overnight in the fridge, then reheat by steaming for 5 minutes or microwaving wrapped in a damp towel for 1-2 minutes per ear until hot and steamy. Avoid boiling reheats to preserve that fresh-off-the-grill snap.
FAQs
Can I make Garlic Butter Corn on the Cob ahead of time?
Yes! Prep the garlic butter up to 2 days ahead and store in the fridge. Husk and cook corn just before serving for best texture. Butter it while hot so flavors soak in—reheat gently to revive that fresh-picked taste.
What if I don’t have fresh parsley?
Dried parsley works great—use half the amount (1 tbsp) and rehydrate in the butter. For a twist, swap with chives or basil for varied herbaceous notes. The garlic still shines, keeping it classic.
How do I fix overcooked or tough corn?
If kernels are chewy, slice them off the cob and sauté in a bit of fresh garlic butter over medium heat for 2-3 minutes. This softens and revives texture. Prevent by testing doneness early with a fork pierce.
Is this recipe scalable for a crowd?
Absolutely—double or triple ingredients easily. Boil in batches or use multiple grill zones. Prep extra butter in advance. For 12 ears, expect 30-40 minutes total time, perfect for parties.
Can I make it dairy-free?
Swap butter for coconut oil or vegan butter alternative. It melts similarly, coating kernels beautifully. Garlic and parsley flavors hold strong for a plant-powered version everyone loves.
Why is my garlic butter not sticking?
Dry the husked corn thoroughly after rinsing—excess water repels butter. Apply while piping hot so it melts and adheres. Brush in layers for full coverage and glossy shine.
Grill vs. boil—which is best for Garlic Butter Corn on the Cob?
Grilling adds smoky char and caramelized edges for bold flavor; boiling yields tender, juicier kernels. Try both—grill for barbecues, boil for quick weeknights. Visual char marks make it extra Pinterest-pretty.
Final Thoughts
You’ve got everything for Garlic Butter Corn on the Cob success—simple, sensational, and ready to steal the show. This recipe captures summer’s joy in every buttery bite, creating memories around the table that linger.
Pin it now, tag a friend, and watch the saves roll in! Fire up the grill or pot today—your taste buds (and feed) deserve this golden glow. Share your pics; I can’t wait to see your mastery. Happy cooking!